Monday, May 28, 2012

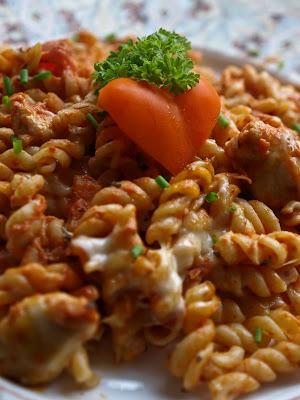
Recipe: Bee's Specialty Pasta


I like to think of this dish as the one that started it all. Okay, maybe that's being a bit dramatic. But it was this particular dish that started off my whole cooking streak. You see, there was this rather upsetting incident at work one day, and I arrived home feeling quite awful about it. Therefore, I decided that some cooking was in order to cheer me up. Maybe cooking doesn't work that way for the rest of you, but it virtually always improves my mood.

Anyways, this pasta dish is one I created quite awhile ago and make with decent frequency for two simple reasons: we almost always have the ingredients on hand and it's really, really delicious.

The first step is to fry up some onions in oil. Once they start to get soft, add the chicken and some minced garlic. Once the chicken has browned on all sides, it's time to season it up. I use a liberal amount of both chipotle chili powder and cayenne pepper, but I suppose it's up to you on the level of spiciness you want. Remember though that it will be diluted by all the sauce and cheese and noodles, so don't be afraid to add more than you think is necessary. Honestly, if my mom could see how much spice I put in this dish, she'd probably have been afraid to even try it, yet she still loves it.


Next step: chop up some peppers (preferably orange or yellow) and throw them in the pan. Meanwhile, cook the noodles. Fusilli is my personal favourite choice for this particular recipe, but that's just me. If you plan on baking the pasta (an optional but excellent step), then preheat the oven now.


While the noodles are cooking, pour a jar of your favourite prepared tomato sauce over the chicken. Mix in about 1/2 cup of cream. Keep it on low heat until the noodles are done.


Pour the sauce over the cooked noodles, mix it all together and pour into a casserole dish. Top with lots and lots of grated cheese and throw in the oven.


When the cheese is bubbly and golden, serve up a huge portion and enjoy. :)


This recipe turns out a bit different every time I make it, since I made it up and I've never bothered to write down the exact proportions. But here it goes, such as it is:

Bee's Specialty Pasta
Ingredients;
2 chicken breasts
1 small onion, chopped
3-5 garlic cloves, minced
1 small orange or yellow bell pepper, chopped
Chipotle chili poweder, to taste
Cayenne pepper, to taste
1 jar of prepared tomato sauce
1/2 cup cream
Fusilli or other noodles
1 cup of grated cheese (cheddar, mozza, etc), optional

Directions;
1. Place the chopped onion in a skillet with some oil over medium-high heat. Meanwhile, slice the chicken breast into even chunks.

2. When the onions are just beginning to soften, add the chicken and the minced garlic to the pan. Brown the chicken on all sides.

3. Begin cooking the pasta and preheat the oven to 400 F if you intend to bake the pasta.

4. Add the chopped bell pepper to the frying pan and turn the heat down low. Pour the jar of tomato sauce over the chicken mixture. Add the cream and stir thoroughly. Keep on low heat, stirring occasionally, until the noodles are cooked.

5. If you're pressed for time, skip the baking step below and simply drain the noodles when they are done cooking and pour the sauce over top. Mix well and serve immediately.

6. If you do have the extra time, drain the noodles and place in an oven-safe casserole dish. Pour the sauce over top and mix thoroughly. Generously cover the top with shredded cheese and place the casserole dish in the oven (without the lid). Everything's already cooked, so all you're really waiting for is for the cheese to melt and get all bubbly. Should take about 10-15 minutes.

Enjoy :)


Saturday, May 26, 2012

Recipe: Fresh Pear and Curry Pasta


Bonjour! It's been awhile, but then I haven't been cooking much. Or at least not cooking anything new and different. And I didn't want to bore you with repeated recipes. Also, I've been trying to sort out my life the last couple of days, because I just got a new job! No, not a teaching job. But still, it's a pretty huge promotion. I'll even have my own assistant. Yay me!

Anyways, I got this absolutely 100% totally delicious recipe from my aunt, who made it for me a couple of weeks ago. I figured now was the perfect time to try it, because with just me and my dad in the house, I could feel free to make it as spicy as I liked.

Not only is the recipe really quite easy and super scrumptious, it is also vegetarian! Now normally I am all about the meat (and to be honest I was quite tempted to throw in some chicken or pork in this recipe, which you totally could if you're not into vegetarian), but I decided to stick with the original intention. Plus I knew from when I had it at my aunt's house that it was super filling, even without any meat.

But on to the actual cooking! First step is to saute up some onions. I used a red onion because that's what I had (plus it adds some more colour to the finished dish), but you could do whatever you like. Next, throw in the garlic and curry paste (I would recommend spicy over mild for this dish, but that's just me) and mix together for a couple of minutes. They should look something like this:


Next comes some tomato paste and honey. Once you add the honey, be prepared for it to start bubbling like mad. I totally didn't expect that, although I suppose I should have. Anyways, it was quite startling. After a few minutes, add some chicken broth and bring to a boil. Keep it boiling until you've reduced the liquid to less than 1 cup (depending on how saucy you like your pasta, you can reduce it less that this. It's up to you!). Since this will take about 15 minutes, now's a great time to start cooking your pasta.


When the sauce is reduced, throw in some thinly sliced pear wedges and cook for 1 minute. Then add in chopped Roma tomatoes and cream. At the last minute stir in some fresh chopped cilantro.


When the pasta is done, pour the sauce over the noodles and toss gently. Serve immediately!


Here's the full recipe:

Fresh Pear and Curry Pasta (Recipe from Joanne Christensen)

Ingredients;
1/2 small onion, chopped
2 Tbsp oil
2 garlic cloves, minced
1 Tbsp curry paste (Patak's in the best! And I would definitely recommend spicy, not mild)
1 tsp tomato paste
2 Tbsp honey
2 cups chicken broth
1 unpeeled ripe pear, sliced in thin wedges
2 Roma tomatoes, chpped
2 Tbsp cream
3 Tbsp chopped cilantro
Pasta for 2: rotini, bow ties, or shells

Directions;
1. In a frying pan over medium heat, saute onion in oil until soft.

2. Add garlic and curry paste and stir 2-3 minutes.

3. Add tomato paste and honey and stir another 2 minutes.

4. Add chicken broth, increase heat to medium high and boil gently, reducing liquid to less than 1 cup. Start cooking your pasta while sauce is reducing.

5. Add pear slices to sauce and cook for 1 minute.

6. Add tomatoes and cream and stir another 2 minutes.

7. Stir in chopped cilantro.

8. Pour sauce over pasta and toss gently.


Enjoy :)


Wednesday, May 16, 2012

Recipe: Grapefruit Cake with Grapefruit Buttercream

Grapefruit Cake with Grapefruit Buttercream

I made this delightfully fresh cake on Mother's Day this past Sunday and, although it was completely delicious and quite an original flavor, my finished product did not look anywhere near as nice as I wanted (which is why I dislike baking. Cooking is so much simpler). So I borrowed the above photo from The Pastry Affair, the blog where I found this recipe.If you've never checked this blog out, you should. Everything I've tried from it has been scrumptious. Plus the pictures on the blog are gorgeous.


Anyways, the cake itself couldn't have been easier to make. Took about half an hour to make. My problem came with the icing. Maybe the cake was still too warm or I didn't reduce the grapefruit juice enough or whatever, but it basically slid off the cake in a bit of a thick soup. Still tasted delicious, but it looked rather like the cake from The Cat in the Hat after the Cat drops it.  Oh well.

The cake has an almost pound cake like consistency, and I think it would be amazing with pretty much any type of icing. Or dipped in fondue. Mmmm fondue.

Here's the recipe:

Grapefruit Cake

Ingredients:
1/2 cup granulated sugar
Zest of 1 grapefruit
2 large eggs
1 cup plain Greek yogurt
1/3 cup olive oil
1 tsp vanilla
1/3 cup + 2 tablespoons freshly squeezed grapefruit juice
2 cups cake flour
1 tbsp baking powder
1/4 tsp salt

Directions:
1. Preheat oven to 350 F and grease two 8-inch cake pans.

2. In a large mixing bowl, mix together sugar and grapefruit zest until fragrant. Beat in eggs one at a time, mixing well after each addition. Mix in yogurt, oil, vanilla, and 2 tablespoons of grapefruit juice. Stir in flour, baking powder, and salt.

3. Evenly divide the the cake pans and bake for 25-30 minutes, or until a toothpick inserted into the center comes out clean. Using a pastry brush, brush remaining 1/3 cup of grapefruit juice on top of the cake layers, allowing the juice to sink into the cake. Allow the cake to cool to room temperature before icing.


Grapefruit Icing

Ingredients:
3/4 cups grapefruit juice
8 tbsp butter, room temperature
Zest of 1 grapefruit
4 cups powdered sugar
Heavy cream

Directions:
1. In a small saucepan, bring the grapefruit juice to a boil. Simmer until it is reduced to about 1/4 cup. Cool to room temperature.

2. In a large mixing bowl, beat the butter and grapefruit zest until smooth. Mix in the thickened grapefruit juice. Gradually add powdered sugar until incorporated and smooth. Add the heavy cream one tablespoon at a time until the icing reaches the desired consistency.


Sunday, May 13, 2012

Life, Books, and Housesitting

Olo!

For those of you who don't understand the above movie reference, it's from Megamind. Watch it. That's all I have to say. So good.

Anyways, my life.Yesterday was both awesome and sucky.

It was the Times Colonist Book Sale yesterday, aka my favourite day of the year. Books, books, books, books. Books! And more books. And after waiting in line for more than 3 hours, and fighting off hordes of other bookies, I came home with some real prizes. 72 of them in fact!! Which means I will officially be taking over more of Matthew's old book shelves, because all of mine are beyond full.

Sadly, I then had to go to work. And give tours of the rec center to prospective new students, none of whome want to be there, but have been dragged unwillingly there by their parents. Sounds like a blast, right? Not.

Then I had to go straight from work to a meeting/potluck. During which time someone egged my car. Seriously, what the hell? Who does that? And in freaking Broadmead of all places? I was seriously not impressed.

And to top it all off, I started to get sick last night. And today, in addition to being Mothers' Day, is also the day I have to move out of my current housesitting place. Back into my room at home, which is still a disaster from the last time I moved home. And now has 72 more books that I have to fit somewhere! Oh well. I suppose I'll have to make do.

Monday, May 7, 2012

Recipe: Spice Rubbed Chicken


This recipe was so beyond easy it was ridiculous. Like I'm pretty sure even the most incompetent cook in the world couldn't screw this up. The original recipe was for chicken thighs, which I think might have worked better simply because they tend to be more juicy than chicken breasts, but since that's all I had, that's what I made. Odd how that works, eh?

The chicken took all of 5 minutes to prepare, and then I just threw it in the oven for 20 minutes. Easy, easy, easy.

Here's the recipe:

Spice Rubbed Chicken:
Ingredients;
2 Tbsp brown sugar
2 tsp cumin (personally, I would put less cumin in - but that's just me)
1 tsp salt
1 tsp garlic powder
1 tsp ground ginger
1 tsp cinnamon
1 tsp cayenne  (I happen to love cayenne, so I definitely added more than 1 tsp. Adds a nice kick!)
1/4 tsp black pepper
10-12 chicken thighs

Directions;
1. Preheat the oven to 425 F and grease a baking sheet.

2. Combine all of the spices in a bowl and mix together so there's no lumps. Pat the mixture over the entire surface of the thighs.

3. Place the thighs on the baking sheet and place in the oven. Cook for about 30-35 minutes depending on the size/number of thighs.


That's it. That's literally all you have to do. It's beyond easy. And quite tasty to boot. :)


And yes. That is another salad with pecans and goat cheese. Sue me! :P

Sunday, May 6, 2012

Recipe: Spinach Salad with Steak & Blueberries


Normally, I'm not a salad person. Like at all. I'm pretty picky about what I like to put in salads (hint: tomatoes get a thumbs down). As a general rule, I don't eat salads with: a) nuts of any kind, b) cheese of any kind, or c) meat (unless it's chicken). As you may imagine, this severely limits my salad options. But like I said, I don't really like salad, so it doesn't really bother me.

All of this changed, however, when I had the California Spring Salad at Milestones Restaurant. This salad is magic, and I quite regularly make a copycat recipe at home. This is the salad which taught me that spinach + goat cheese + pecans + any kind of vinaigrette = deliciousness.

I know what you're thinking. Goat cheese? Pecans? I thought you don't eat salad with nuts or cheese, never mind both? This is all very true. But over the years I have given up trying to understand my very finicky tastebuds and have simply learned to embrace whatever they choose to tell me. In this case? That goat cheese and pecans are a match made in heaven.

Anyways, I digress. My mom brought the recipe for this scrumptious salad home from our local grocery store and I knew right away that it had to try it. Did it have goat cheese and pecans in it? No. But that was easily remedied. In fact, the original recipe called for feta and walnuts, both of which I hate, but the substitution was very easily done. I'm sure the original recipe is good too ... you know, if you're into that kind of thing.

Although this salad cost a mint to make (having none of the ingredients on hand except olive oil and salt/pepper, I was forced to make an emergency grocery store run. My recommendation? Make this recipe when blueberries are in season. Holy expensive fruit, Batman!) ...  it was absolutely worth it! Tangy, filling and delicious, it was also ready to eat in 15 minutes flat. Now that's my kind of meal!

The only remotely difficult thing about this recipe is cooking the steak to your desired level of well-doneness. If you can handle that, you're golden. First step? In a food processor or Magic Bullet, combine some blueberries, pecans, minced shallot, sugar, salt and vinegar to form a sort of paste which will be the base of your vinaigrette. When that's done, slowly blend in the olive oil until it's completely mixed in. It should look something like this:


Meanwhile, throw your steak on the grill/frying pan. It's getting to be barbecue season, so I recommend you cook it on the grill. But if Victoria is up to its usual weather antics and you don't want to brave the wet outdoors, then just cook it in a skillet on the stove top.

While the steak is cooking, rip the spinach into bite-size portions and pile on a plate. Top with toasted pecans (either whole or crumbled, your choice), fresh blueberries and crumbled goat cheese. When the steak is done, let it sit for a few minutes before slicing it into bite sliced strips and layering on top of the salad. Drizzle the vinaigrette on top, and devour at will.**

**A note about the vinaigrette: I followed the recipe exactly the first time, but as you can see from the pictures, the dressing still turned out quite thick. It tasted amazing, but for ease of pourage/presentation, I would double the amount of olive oil that it calls for.


Here's the full recipe:

Spinach Salad with Steak and Blueberries


Ingredients;
1 cup fresh blueberries, divided
1/2 cup chopped walnuts/pecans, toasted  (2-4 minutes in a dry skillet)
3 Tbsp fruity vinegar, such as raspberry vinegar
1 Tbsp minced shallot
1 tsp sugar
1/2 tsp salt, divided
3 Tbsp olive oil
1 pound sirloin or strip steak (1 - 1 1/4 inches thick), trimmed
1/2 tsp freshly ground pepper
8 cups baby spinach
1/4 cup crumbled feta/goat cheese

Directions;
1.  Preheat the grill to medium

2.  Pulse 1/4 cup blueberries, 1/4 nuts, vinegar, shallot, sugar and 1/4 tsp salt in a food processor to form a chunky paste. With the motor running, add oil until incorporated. Transfer the dressing to a large bowl.

3. Sprinkle steak with pepper and remaining salt. Grill the steak about 5 minutes per side for medium-rare, 6 minutes per side for medium. Let rest on a clean cutting board for 5 minutes.

4. Add spinach to the bowl with the dressing; toss to coat. Divide the spinach among 4 plates. Thinly slice the steak crosswise. Top the spinach with the steak, cheese, and remaining blueberries and walnuts.

Makes 2 very large portions.


Friday, May 4, 2012

Nerdville: The Avengers


Tonight was opening night for, The Avengers, the latest in a long ling of Marvel movies. What makes this one so special? I have 6 words for you:

Thor.
Captain America.
Hulk.
Iron Man.
Black Widow.
Hawkeye.

(Okay, technically that was 9 words. But 6 people, so that's close enough, right?)

All of them. In one movie. It's like I've died and gone to superhero-comic book nerd heaven. Not to mention the fact that it's directed/written by my all-time favourite sci-fi hero, Joss Whedon. Joss and I are, not gonna lie, pretty tight. I mean, sure, we've never actually met, but I've watched pretty much everything he's ever made with rabid enthusiasm (the one exception being Dollhouse -- sorry Joss. I liked it, but it's certainly no Firefly. It's not even a Buffy.)

Anyways, back to The Avengers. It was AMAZING. So, so, so, so, so, so good. I mean, I know I like superhero movies more than most people. In fact, I even do a fairly good job of tolerating the terrible ones (Daredevil, anyone?). But this? This was magic.

It goes without saying that the action and the fight scenes were phenomenal. How could they not be with that many heroes in play? But mostly I love how true to character they stayed (i.e., the various heroes spend most of the movie fighting each other over various ego trips) and Joss' brilliant humour, which he brings to all of his films (except again not with Dollhouse. What's up with that, Joss?). I'm not sure what is so inherently funny about the Hulk beating the crap out of our villain, but it's pretty damn hilarious.

If you like superhero movies, what are you still doing reading this blog? GO SEE THIS MOVIE. If you don't like superhero movies, shame on you.

Just kidding.
(Well, sort of anyways)

If you don't like superhero movies (really? really? who are you?), I still think you should go see this movie because it's a riotously fun ride. Is it ridiculously implausible? Yes. Does it involve a) aliens, b) genetic engineering far beyond our capabilities, and c) Samuel L. Jackson wearing an eye-patch? Yes, yes, and yes. What's not to love? Not a damn thing.


Thursday, May 3, 2012

Recipe: Chocolate Chip Macadamia Nut Muffins


I have one word for these muffins: scrumptious. Scrumptious, scrumptious, scrumptious. I discovered this recipe about two months ago I'd say, and I've made it at least 5 times. And every time the entire batch disappears in like a day. Maybe a day and a half if we're not feeling particularly snackish in our house on that particular day. I've modified the recipe slightly to make the muffins lighter than the original, which I found here.

Anyways, your first step is easy. Turn on the oven to 350 degrees and either grease a muffin tray or line it with muffin cups.

In one bowl, combine the dry ingredients. In another, whisk together the egg and sugar. Then slowly mix in the melted butter and sour cream. The finished mixture should look something like this:


Next, add the chocolate chips and chopped macadamia nuts to the liquids and toss to coat. Fun fact that I learned from my grandmother: you can freeze macadamia nuts to keep them fresh until you need them.


Once you've mixed in the chocolate and nuts, then it's time to add the dry ingredients. The important thing here is not to overmix it. A few lumps are still fine when you're done. If you stick to the original recipe, these muffins turn out quite dense, so I like to add an extra 1/4 cup of milk or so at this stage, but that's up to you. The finished batter should look something like this:


Spoon the batter into the muffin cups, making sure to distribute the batter as evenly as possible. I find this recipe usually makes about a dozen very large muffins or 15-16 smaller muffins. It's up to you and the size of your muffin tray. :)


Throw the muffins in the oven for about 20-25 minutes, or until they're slightly golden brown on the top. These muffins are pretty pale even when they're cooked through. You don't want to overdo it!

Pull them out of the oven, and enjoy them fresh and warm when the chocolate chips are still melted. Mmmmmmm.


Here's the full recipe:

Chocolate Chip Macadamia Nut Muffins:


Ingredients:
2 cups all-purpose flour
1 Tbsp baking powder
1/2 teaspoon salt (if you use salted macadamia nuts, omit the salt)
1 egg
1 cup sugar
1/4 unsalted butter, melted
1 1/4 cups sour cream
1 cup semi-sweet chocolate chips
1 cup macadamia nuts, chopped coarsely
1/4 cup milk (optional)

Directions;

1. Preheat oven to 350 degrees. Grease a muffin pan or line with muffin cups. Set aside.

2. Combine the flour, baking powder and salt in a medium bowl; set aside.

3. In a large bowl, whisk the egg until combined, about 20 seconds. Add the sugar and whisk until the mixture is thick and thoroughly combined. Slowly whisk the butter into the mixture until combined. Add half the sour cream, whisking until just combined, repeat with the remaining sour cream.

4. Add the chocolate chips and macadamia nuts to the flour mixture and toss to coat.

5. Add the flour to the sour cream mixture and fold with a spatula until combined and the chips and nuts are evenly distributed, but do not overmix.

6. Evenly divide the batter in between the cups of the muffin pan. Bake for 20-23 minutes, or until very light golden brown colour and a toothpick inserted in the center comes out clean. Transfer the muffins to a wire cooling rack and allow to cool for at least 10 minutes before serving.


Update: Housesitting

Bonjour!

My life has been a bit topsy turvy of late. I was housesitting at one place, I moved home for 1 night (and did a hella lot of laundry), and then proceeded to move into a new housesitting place. With all that moving back and forth, I haven't had much chance for cooking but I did manage to go grocery shopping last night, so I should be able to manage something relatively soon. In fact, I think I may bake some delicious muffins this afternoon and post the recipe later on.

But first, look at this face. Really, who could say no to her?


This is Nellie, the psychotic, ultra-needy, and yet somehow still completely lovable goldendoodle that I was looking after during my first housesitting stint. And as crazy and neurotic as she was (going up and down stairs with her around was nearly impossible -- she was always trying to sit on my feet!), I totally miss her.

When I went back a few days ago to return the key she basically wet herself in her excitement at seeing me again ... not going to lie, it's a pretty good feeling having someone that excited to see you when you get home. On the plus side though, I'm very much enjoying no longer being woken up at ungodly hours of the morning simply because there's a squirrel in the backyard.

Anyway, here's to you Nellie!