Thursday, April 26, 2012

Nerdville: Star Trek Cookies


Now, as most of you know, I am not a true Trekkie. Sure, I love the new Star Trek movie with Chris Pine (which I definitely did didn't watch this morning in my pajamas) and am beyond excited to see the sequel when it finally comes out in May next year (2013? Really? Get it together guys! You have fans that want to see this!)

And you know what, I even enjoy the occasional dose of the good ol' fashioned original series or Next Generation. But I know some Trekkies, and I am definitely not one of them.

But even I couldn't contain my squeals of glee when I saw these two posts on one of my favourite food blogs ... seriously, who knew you could make Spock so adorable??


So. Freaking. Cute. Aaaaah. I might die.

But wait! There's more. Look at these!!!


Adorable. ADORABLE.

Both of the images above link to the original blog posts, with full instructions on how to make your own scrumptious, adorable Star Trek cookies!

Live long and prosper!

Monday, April 23, 2012

Recipe: Maple Roast Pork Tenderloin


It's time for another recipe, this time birthday style! Yesterday was my gramma's birthday, and I cooked jher a birthday meal for her and the rest of the family. This was only the second time I'd cooked this particular recipe, but it turned out fabulously and I'm glad I now have a chance to share it on the blog because, really, everyone should try this. It. Is. Delicious.


I didn't take any pictures of the process this time because well, you know, I was concentrating on making sure everything was ready on time. And not burning stuff.


So, without further ado, I will skip straight to the full recipe:


Maple Roast Pork Tenderloin with Apples
Ingredients:
½ cup maple syrup2 Tbsp Dijon or grainy mustard2 Tbsp chopped fresh rosemary (optional)2 Tbsp lemon juice2 Tbsp soy sauce2 ¾ lb pork tenderloins1 Tbsp canola oil1 Tbsp butter3 large Granny Smith, McIntosh or other tart apples, peeled, cored and sliced1 ½ cups apple cider or juice1 tsp cornstarch


Directions:
1. In a small bowl, whisk together the maple syrup, mustard, rosemary, lemon juice and soy sauce. Pour over the pork and marinate for at least 2 hours, or overnight. Preheat the oven to 450 degrees.


2. Heat the oil in a large skillet set over medium-high heat. Remove the pork from the marinade, reserving the marinade, and brown the tenderloins on all sides, turning as necessary. This should take about 5 minutes.


3.  Transfer the pork to a baking dish and bake for 20-25 minutes. Transfer the pork to a cutting board, cover it with foil, and let it stand until you’re ready for it.


4.  Meanwhile, add the butter to the skillet (don’t wash it out!) and sauté the apples for 5-7 minutes, until the apples are tender and golden. Transfer the apples to a plate. Add the marinade and apple cider to the pan and bring to a simmer, scraping up any flavourful browned bits stuck to the bottom of the pan.


5.  Pour a small amount of the sauce (about ¼ cup) into a small dish, whisk in the cornstarch until you get rid of all the lumps, and return the mixture to the pan. Simmer for about 5 minutes, until the sauce is slightly thickened. Return the apples to the sauce along with any juices that have collected on the plate.


6.  Slice the pork and serve it topped with the apples and sauce.


Happy Birthday Gramma!

Saturday, April 21, 2012

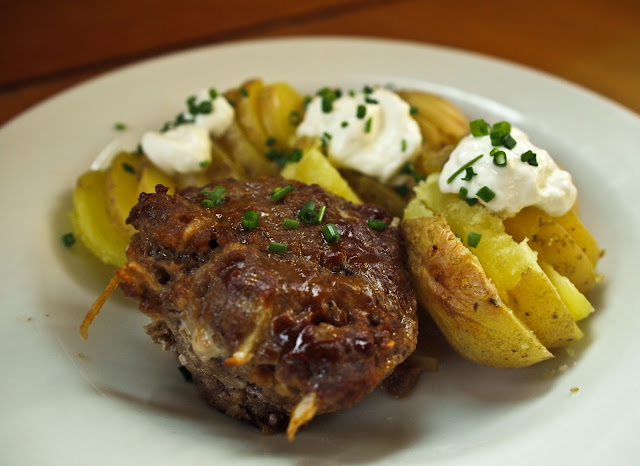
Recipe: Spicy Individual Meatloaves


You know what's really hard to do? Take an appetizing picture of meatloaf. Don't get me wrong. I love meatloaf. And this meatloaf was freakin' amazing. But meatloaf does not photograph well. :(

Ah well. Photographs aside, I am very proud to say that I came up with this recipe myself. The idea for individual meatloaves came from my lovely aunt (thanks!), and I thought it was brilliant, especially since I am currently living alone (not counting the dog, who I'm very certain wanted to be included in the guest list for tonight's dinner). There were 2 added bonuses of making small individual meatloaves: 1) it took way less time to cook, and 2) the leftovers can be wrapped and frozen individually for future meals. Woohoo!

The actual ingredients for these bites of savory goodness were more a result of what I happened to have on hand, so the recipe will be less precise than usual. No matter. Meatloaf is one of those very flexible dishes that you can flavour or spice however you want (within reason though, of course).


Your first step is, of course, to make a big gooey mess. Combine some ground beef, Italian sausage meat, thinly sliced onion, garlic, barbecue sauce, cracker crumbs and Worcestershire sauce and mix with you hands until everything is evenly combined.


Fill a muffin tray with the meat mixture and brush the tops of each with barbecue sauce. No need to grease the tray beforehand -- the beef would probably have enough juice on its own not to stick, but the sausage makes extra sure of that. Once the tray is full, simply fire it in the oven at 350F for 20 minutes, and presto! Mini meatloaves. They pop out of the muffin pan like a charm, leaving most of the fat behind in the bottom of each cup. It makes the pan a disgusting mess to deal with, but it means you avoid that nasty layer of squishy fat that you sometimes get on the bottom of meatloaf.

Serve with potatoes or rice, or whatever else strikes your fancy. Enjoy!


Here's the full recipe, but most of the measurements are approximate, so feel free to jimmy with them to suit your preferences:

Spicy Individual Meatloaves
Ingredients:
1 pkg lean ground beef
1/2 pkg spicy Italian sausage meat
1 onion, minced
2 garlic cloves, minced
1/2 cup barbecue sauce (+ however much you brush on top of each individual "loaf")
1 1/2 Tbsp Worcestershire sauce
10-15 crackers, crushed into fine crumbs
Salt and pepper to taste

Directions;
1. Preheat the oven to 350 F.

2. In a large bowl, mix together all ingredients until evenly combined.

3. Place an even amount of the meat mixture in each cup of a muffin tray. If you fill them really full, you may want to put a baking sheet under the muffin tray when you cook them to catch any juices that run off.

4. Brush each loaf with additional barbecue sauce.

5. Cook for 20 minutes, then remove from muffin tray, leaving behind the excess fat.

Wednesday, April 18, 2012

Recipe: Creamy Tomato Fusilli with Spicy Sausage


Hello! I am back in the kitchen after what has been a bit of a necessary hiatus. I cooked my first ever turkey for Easter (more on that later), and then we basically survived off of leftovers for a week, so there wasn't any real need for me to be cooking.

Anyhoo ... today was my first time doing real cooking at the place where I'm house-sitting (as opposed to reheating food other people have cooked), and let me tell you, I don't particularly enjoy using someone else's kitchen. Well, that's not entirely true. This kitchen is beautiful and has a ton of counter space. What I dislike is not being able to find anything when I need it!! So annoying. Ah well. I am pretty well acquainted with their organizational scheme now, having rifled through every single drawer and cupboard several times over the course of cooking this one meal.

I digress. I adlibbed with this recipe a lot because, well, it's pasta and you can do that. But mostly because I forgot to buy some of the ingredients. Regardless, it was DELICIOUS. And I've never done much cooking with Italian sausage, so I found the flavor delightfully different than my usual fare. Yum, yum, yum.


First step? Brown some spicy Italian sausage meat in a skillet. No need to add oil, unless you buy super extra lean sausages. Since I find the idea of un-casing sausages and crumbling the meat myself repulsive, I just bought a tray of Italian sausage meat. Sausage casing = gross. Anyways, once the meat is just browned, add in some fresh chopped garlic and yellow bell pepper.


Then throw some diced tomatoes and chicken broth in the pan, along with whatever spices you like. Depending on the spicyness level of the sausage you use, you'll want to adjust your spices as necessary.


The finishing touch? Add in some whipping cream! I'm sure regular ol' heavy cream would work as well, but since I had leftover whipping cream from Easter, that worked out perfect. Depending on how creamy you like your pasta, you can adjust the amount of cream you add.

Pour the sauce over cooked pasta and mix together. Layer half the pasta in a baking dish, top with shredded cheese, pour on the rest of the pasta, and top with more cheese. Bake in the oven for 15-20 minutes, or until the cheese is melted.


Here's the full recipe (which, shockingly, is from The Guy Can't Cook by Cinda Chavich)


Baked Fusilli with Spicy Sausage and Creamy Tomato Sauce*
Ingredients:
1 lb (500g) spicy Italian sausages, casings removed, crumbled
4 garlic cloves, finely chopped
1 yellow bell pepper, cut into slivers
1 lb (500g) cherry tomatoes, halved (or one 796 mL can diced tomatoes)
1 cup chicken or beef broth
1/2 cup whipping cream
1 lb (500g) fusilli (or other short pasta - rigatoni, penne, etc)
1 cup freshly grated Parmesan cheese
1 cup grated mozzarella cheese
1/2 cup fresh basil leaves, slivered  (I didn't have any of these, so I didn't add them -- still delicious though)
freshly grated Parmesan cheese, for garnish

Directions:
1. Heat a large saucepan over medium-high heat and add the crumbled sausage. Saute for 5-10 minutes or until it begins to brown. Add a splash of olive oil if the sausage is very lean. Add the garlic and bell pepper to the pan and saute for 5 minutes. Stir in the cherry tomatoes and cook 1 minute longer. Add the broth and stir up any brown bits from the bottom of the pan. Bring to a boil and cook for 5 minutes or until the broth has reduced by half. Reduce heat to low and simmer. Slowly add the whipping cream and simmer until the sauce is thick enough to coat the back of a spoon.

2. Meanwhile, cook the pasta until al dente. Drain and mix with the sauce. Stir in the basil.

3. Rub a 9x13 inch baking dish with olive oil. Pour half of the pasta into the dish. Combine the two cheeses. Scatter half of the cheese mixture over the pasta, then fill the dish with the remaining pasta and top with the remaining cheese. Bake at 375 F for 20-30 minutes or until the cheese is bubbly and browned on top.

Serves 6.


*Note: the original recipe called for rigatoni, not fusilli, but fusilli is my favourite, so I switched it.

Friday, April 13, 2012

Nerdville: J.K.'s New Book

Hello folks! My apologies for the lack of updates lately... don't worry. I'll be resuming my regular scheduled programming shortly.

Anyways, just this short update to say: I PRE-ORDERED J.K. ROWLING'S NEW BOOK TODAY!!

It doesn't come out until September, but I'm ridiculously excited. And nervous. And excited. And scared. I'm pretty sure there is no way that it could be better than the Harry Potter series, but what if it's worse? Like, a lot worse? What if I have to downgrade her from idol to just regular ol' person status? (Who am I kidding? She'll still be my idol even if the book is horrendous).

Anyways, that is all. To read more about it (and pre-order your own copy!), check out the Amazon link: http://www.amazon.com/gp/product/ref=pe_button/?ASIN=0316228532

Wednesday, April 4, 2012

Recipe: Kung Pao Pork + Fried Rice


Today? Today me and the kitchen were not friends. Yet in spite of that, this meal turned out delicious.

But like I said, today was not a good cooking today. I dropped the radishes all over the floor. I put an ingredient from the fried rice into the sauce for the kung pao pork, instead of the ingredient that I made a special trip to the store for today. In the middle of making the fried rice, I discovered that we were out of eggs. We are never out of eggs. Anyways, you get the idea. Luckily both of these recipes are very forgiving.

The pork needs to marinate for about half an hour before you start cooking it, so you do need to think a little ahead of time if you want to make this. While it's stewing in the fridge, get going on chopping up some veggies. You can throw pretty much any vegetables that you feel like in the fried rice, which is partly what makes it so great!


Once the pork is done marinating, brown it in oil in a wok (or frying pan if you're too lazy to get the wok off the top shelf). Not that I would do that. Nope.


Yum, yum, yum. As soon as the pork is browned, pull it off the pan and throw in the veggies: onions, peppers, snow peas. Then pour the sauce over it and bring to a boil.


It'll start to thicken up because of the cornstarch, so you'll want to add the pork back in fairly quickly. Make sure the pork is cooked all the way through, but don't overdo it. You want it to be tender!

In the meantime, while this is all going on, you can be frying up your rice and whatever veggies you decided to add. Normally, of course, there are eggs in fried rice, but as previously mentioned, I didn't have any. Didn't matter. Still turned out great. Whip up a little mixture of sesame oil, soy sauce and chili paste and pour it over the rice. Add some chopped green onions at the last minute, and voila!


Delicious! I like to fry it until the bottom gets just a tiny bit crispy, and then flip it over and let the other side crisp up as well. Yum.

When the pork is done, pile it on top of some rice, top with unsalted peanuts or cashews, and dig in!


Here are the recipes (although admittedly, the fried recipe was only very loosely followed), both taken from The Guy Can't Cook by Cinda Chavich.

Kung Pao Pork
Ingredients:
1 lb (500g) pork tenderloin (or boneless chicken), cut in 1-inch cubes
1 Tbsp soy sauce
1/2 tsp Asian chili paste
1 tsp cornstarch

Sauce:
1 cup chicken stock
2 Tbsp Chinese black bean sauce (or, you know, hoisin sauce. Cuz that's what I did by accident.)
1 Tbsp soy sauce
1 Tbsp brown sugar
1 tsp Asian chili paste
1 Tbsp cornstarch

2 Tbsp canola oil, divided
1 small onion, slivered
2 tsp ginger, minced
2 cloves garlic, minced
1 small dried red chili pepper, crumbled
1 red or yellow bell pepper, diced into 1/2 inch cubes
1/2 cup snow peas
2 green onions, cut into 1-inch lengths
1/2 cup roasted unsalted peanuts or cashews

Directions:
1. Marinate the pork in the soy sauce, chili paste, and 1 tsp cornstarch for 30 minutes in the refrigerator.

2. Meanwhile, make the sauce. In a small bowl, combine the stock, black bean sauce, soy sauce, brown sugar, chili paste and 1 Tbsp cornstarch. Set aside.

3. Heat a wok over high heat for 30 seconds before adding 1 Tbsp of the oil. Add the pork to the hot wok and stir-fry for 2-3 minutes or until it's no longer pink. Remove the pork and set aside.

4. Add the remaining oil to the wok. Add the onion, ginger, garlic, dried chili pepper, bell pepper, and snow peas. Stir-fry for 1 minute. Add the reserved sauce and bring to a boil.

5. Return the pork to the wok. Bring to a boil and heat through. Stir in the peanuts and serve immediately over rice or noodles.

Serves 4.


Special Fried Rice
Ingredients:
Any vegetables you feel like (I used carrots, peppers, and radishes)
3 Tbsp canola oil
1 Tbsp minced garlic
3-4 cups leftover cooked rice, cold
2 eggs, lightly beaten with 1 tsp sesame oil
2 Tbsp light soy sauce
1 Tbsp oyster sauce or hoisin sauce
2 green onions, chopped
Optional: 1/2 lb cooked chicken, roast pork, or turkey, chopped into small cubes

Directions;
1. Wash and chop whichever vegetables you're choosing to use.

2. Place a wok over high heat for 30 seconds, then drizzle with the oil. Immediately add the garlic and stir-fry for 1 minute. Turn the heat down slightly and add the rice, spreading it evenly over the surface of the pan. Stir-fry the rice for 1-2 minutes, and then add the veggies. Cook for 3 to 5 minutes longer, stirring, until the vegetables begin to soften. If you're adding meat to your rice, than do so.

3. Push the rice mixture to one side of the pan and add the beaten eggs, stirring to lightly scramble before mixing into the rice. In a small bowl, whisk together the soy and oyster sauce and drizzle over the stir-fried rice. Toss to combine. Add the green onions and serve immediately.

Serve 4.


And just because kung pao is super fun to say, and I'm a nerd, I'll leave you with this image. I'll leave it to you to figure out why. :)

Monday, April 2, 2012

Recipe: Bistro Ham and Cheese


Yum. For those of you who know me well, you know I am all about eating breakfast for dinner. It's pretty much my favourite thing. And this recipe? It's like French toast meets grilled cheese, which basically makes it the best breakfast-for-dinner sandwich EVER. Also, it takes all of 15 minutes to make. Bonus!

A key factor in this recipe is obviously the bread. I bought me some 3 cheese bread from Thrifty's, and it was perfect. Yum. Don't slice it too thick though if you want the sandwiches to heat evenly all the way through.


Slather one piece of bread with your preferred type of mustard - dijon, honey, regular ol' French's. Then layer Swiss cheese, smoked ham, and some more cheese. The original recipe called for slathering the top slice with mayonnaise, but I substituted some Chipotle Lemonaise instead. Yum.

Then dip the sandwich in the egg mixture, just like you would French toast. Shake off the extra liquid - you don't want it to be soggy! Then throw it in the frying pan.


Cook on medium heat for about 5 minutes on each side, or until golden brown and your preferred level of crispiness. Cut, and serve!


Here's the full recipe:

Bistro Ham and Cheese
Recipe from "The Guy Can't Cook" by Cinda Chavich


Ingredients:
8 slices French bread
2 Tbsp Dijon mustard
8 slices Swiss cheese
12 thin slices lean, smoked ham
3 Tbsp mayonnaise
3 eggs, beaten
1/4 cup milk, or cream
1/4 tsp salt
2 Tbsp butter
2 Tbsp olive oil

Directions:
1. Spread four slices of bread with mustard and place on counter. Top each with a slice of cheese, three slices of ham, and another slice of cheese. Slather each of the remaining four slices of bread with mayonnaise and set on top, pressing down slightly, to make four sandwiches.

2. In a bowl, whisk together the egg, milk and salt. Pour into a wide, shallow dish, large enough to hold a sandwich.

3. In a large, non-stick skillet, heat half of the butter and oil together over medium heat. When the pan is hot, dip each side of the sandwich into the egg mixture. Shake off any excess and place in the hot pan. Fry until browned on both sides, about 5 minutes per side. Repeat with the remaining sandwiches, then slice them on the diagonal to serve.

Serves 4 - and believe me, these sandwiches are plenty filling.